SICKOS:1.2 Vulnhub Walkthrough

Hello Guys! This is Russell Murad working as a Junior Security Engineer at Enterprise Infosec Consultants (EIC).
In the previous post, we’ve solved a vulnhub machine called “SickOS:1.1”.
Today, we’ll see how to solve “SickOS:1.2” easily.
So, let’s get started!
I’ve configured both Vulnhub machine and my kali machine on the Virtualbox bridge connection.
- First, we are going to check our victim machine’s IP using arp-scan.

2. Then we need to find some open ports using nmap.

3. Here we’ve found two-port — 22 for SSH and 88 for HTTP. There is also a directory named “/test/” which we will use for future enumeration.
Let’s browse the site now.

4. It’s simply a troll page! Nothing important here. So, for more info, let’s check the source.

It says, “NOTHING IS HERE”.
5. Now, in this situation, we can run Nikto for server vulnerability discovery. But then again, nothing useful will found. After that, we’ll go for Directory Bruteforce using goBuster.

6. The “/~sys~” directory has a 403 forbidden error. But another directory called “test” will be like this.

7. It’s time to check the webpage with curl.

8. We can see there is a PUT method that we can use to leverage shell uploading. We’ll use Pentest Monkey’s reverse shell here…

9. We’ll fire a Netcat listener and click the shell file from the browser.


10. If you check the System && Kernel version, We’ll see that it’s Ubuntu 12.04.4 LTS. Most of this version has the vulnerability called “Dirty Cow”.


11. Let’s check it’s exploit file in dirty cow CVE’s official site.


12. We’ll download this exploit into our kali machine and by making a python SimpleHTTPServer we’ll transfer this into our target machine.

13. We’ll compile the exploit with GCC and run the executable file. By using this exploit we can modify and change the password.

14. Now, we’ll log in to our SSH with the new password we’ve created.

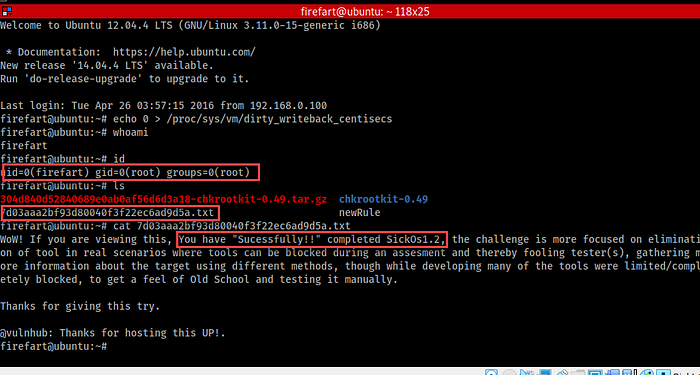
For the sake of making our exploit stable we need to run the following command, “echo 0 > /proc/sys/vm/dirty_writeback_centisecs”
Otherwise, the victim system will get freeze and reboot.
There’s an issue closed in Github about this problem.

15. Now we can see we have the root privilege and the flag file.
This box was a little bit confusing while enumerating. But overall it was worth trying.
So, guys, that’s it for today.
Thank you for reading this write-up. Cheers!