Mr.Robot-1: Vulnhub Walkthrough
Hello Guys! It’s me, Russell Murad, working as a Junior Security Engineer at Enterprise Infosec
Consultants (EIC).
In this writeup, we’ll solve a vulnerable box called “Mr.Robot”. Personally, I’ve watched the TV series and felt really fascinated. So, I was really excited while solving the box.
But honestly, it was really easy, except for a little bit of brute-forcing part.
Official vulnhub website says, “This VM has three keys hidden in different locations. Your goal is to find all three. Each key is progressively difficult to find.”
Now, download the machine from here.
I’ve configured both the Vulnhub machine and my kali machine on the virtual box bridge connection.
So, let’s begin…
1. First, we’ll use arp-scan to check our victim machine’s IP address.
arp-scan -l
2. After that we need to find some open port and service enumeration. So, we’ll use Nmap for that. Command –
nmap -sC -sV -A -O -p- -T4 — script http-enum 192.168.136.113
Here, we can see that we’ve got two open ports — 80, 443 which is HTTP, HTTPS. There’s a closed SSH port, which is of no use.
3. Now, we’ll use a directory bruteforcing tool called “goBuster” for finding some directory and files. Command –
gobuster dir -u http://192.168.0.113/ -x php,txt,bak,old,zip,gz,conf,cnf,js -w /home/kali/Desktop/Big.txt -t 40

4. There’s are a lot of directories we’ve found so far. But most of them are not so juicy or forbidden. But there’s a directory named “0” that seems interesting to us. After browsing it we’ll see it’s a WordPress site. Which we’ll enumerate later.

5. And also there’s a “/robots.txt” file we’ve found. It contains two files — fsocity.dic, a dictionary file, key-1-of-3.txt, first key file of our machine.


6. Let’s download the “fsocity.dic” file. It’s a dictionary file, which we can use for bruteforcing.

7. Now we open up the “/wp-login.php” file and while we trying to log in by using a random password, we’ll observe that the site gives us a message whether the user is present or not.
It’s a chance for us!
Because if we choose to bruteforcing the username instead of bruteforcing the password, then by observing the message we’ll know for sure a particular user is present or not.
By leveraging this then we can try to break passwords for sure.

8. Let’s brute force the username by using Hydra. Before that. we intercept the Post request using the Burp, we’ll find the parameters name and error message.

With those, we’ll set up our Hydra http-form-post. The command is given below –
hydra -t 64 -L fsocity.dic -p test 192.168.0.113 http-form-post “/pw-login.php:log=^USER^&pwd=^PASS^:Invalid”
Here, we’ve found our username, “Elliot”. Who is the protagonist of the TV Series- MR. Robot. Time to Bruteforce Elliot’s password!
9. While we try to brute-force Elliot’s password, we’ll see it’ll consume a lot of time. Because the dictionary they’ve provided contains a lot of duplicate words. If we clean up this mess, we can find out the password faster.
Here’s the command I’ve used to remove the duplicate word from the dictionary –
awk ‘!x[$0]++’ fsocity.dic > newsocity.txt“newsocity.txt” is the new password dictionary that only contains unique words of that “fsocity.dic” file. Now let’s continue to our wpscanner bruteforcing task.


Here, we see the password of the user — Elliot is, “ER28–0652”.
10. Let’s login with those credentials.

11. We’ll check the site and realize it’s an admin account. Now let’s try to upload a shell using the “Edit Themes” option. There’s a 404 page. We’ll copy-paste the pentest monkey’s PHP reverse shell there.

12. Let’s open up a Netcat listener and browse the 404 page. We’ll see the netcat will get a response from the server.


13. Let’s browse the “/home” directory. We’ll see another directory called, “/robot”. Inside that directory, there are two files, password.raw-md5, and key-2-of-3.txt. password file seems to be an md5 hash, from which we can access the “robot” account.
Let’s decrypt the hash now.

14. We’ll use Hashes.com here.

15. Now we’ll use this password to switch user “robot”. Now let’s open our second key file.

16. Time to privilege escalation. We’ll use the Find command to search for some SUID Binary files.

17. There we can see “/usr/local/bin/nmap” has privilege, Let’s run it interactive mode. The older version of Nmap can run bash, let’s try it by using the command, “!sh” and boom! We’ve got root!
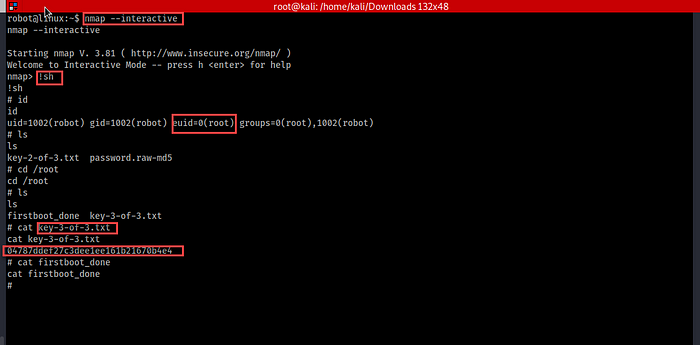
Now check out the /root directory and read the final key.
So, guys, that’s it for today.
Thank you for reading this write-up. Cheers!