LazySysAdmin-1: Vulnhub Walkthrough

Hello Guys! This is Russell Murad working as a Junior Security Engineer at Enterprise Infosec Consultants (EIC).
In this writeup, we’ll break a machine named “LazySysAdmin: 1.0”. You can download it from here.
So, let’s get started…
- First, we are going to check our victim machine’s IP using arp-scan.

2. Then we need to find some open ports using Nmap.

3. Here we can see 6 ports are open and functional. Those are — 22,80,139,445,3306,6667.
Besides that, some directories have also shown which we’ll use later on. Now, let do some directory brute forcing using goBuster.

4. We’ll use Nikto for server vulnerability scan, there’s not much for us for now.

5. Let’s check those directories one by one now.


6. We can see there are -
info.php — Server + PHP information.
Phpmyadmin directory.
WordPress login panel.
wp-includes some juicy content but unfortunately those can’t be read at this moment! We tried with Burp but no luck.
7. Now we’ll try Wpscanner for the targeted WordPress site. There are two username — admin, Admin. We did try some password Bruteforce. But it takes a long, long time and doesn’t seem to work.

8. From the results of Nmap we know that there is a NetBIOS service running in port 139, 445. Now which we will try to enumerate.

The system admin of this service is very very lazy that he didn’t even set a password on that. We’ll download the deets.txt and open it. There’s a password! Sweet!

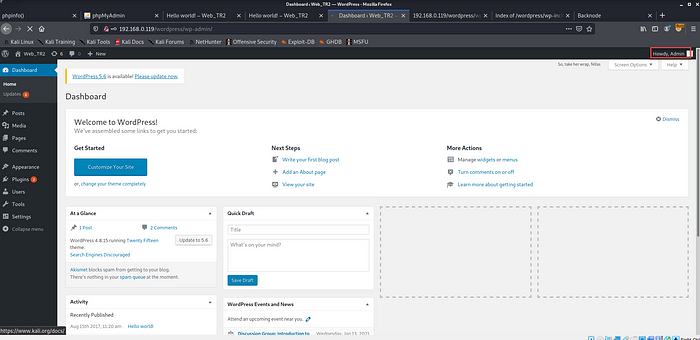
9. Let’s grab the wp-config.php file. After open that file we can see the whole database username and password is there.


10. Let’s use that username, password to log in to the WordPress site. It’ll work.
11. Now we go to the “Editor” and replace the 404.php code with the pentest monkey’s PHP-reverse-shell. Upload it.

12. Now, we’ll open up a Netcat listener and hit the “wordpress/wp-content/themes/twentyfifteen/404.php” URL and we’ll see our Netcat will receive a response from the server.


13. If we remember opening up our WordPress site. There was a user called “togie”. Let’s check if any user account named “togie” exists on the server. We’ll try the previous password we’ve got.
And it’ll work like a charm!
We’ll check the user permission using “sudo -l” and we’ll see user “togie” can run any command without passwords.
We’ll leverage it using “sudo su” and get root access.
Let’s read the “proof.txt” file.

So, guys, that’s it for today! Hope we’ll see each other in the next write-up.
Thank you for reading this write-up. Cheers!